Mastering the Craft: Starting on a journey into wine making requires not only passion but also a deep understanding of the intricate processes involved. One crucial aspect of this art is the creation of a Yeast Starter, a technique that goes beyond merely checking yeast viability. In this guide, we’ll explore the advantages of Yeast Starters and provide you with expert insights on creating the perfect foundation for your fermentation journey.
Let’s unravel the secrets, step by step, of creating a robust and lively Yeast Starter that will set the stage for your homemade wine masterpiece.
Introduction To A Yeast Starter
Use a wine Yeast Starter to check your yeast is healthy, increase the volume of yeast, and save yeast for your next project.
Fermentistry.com
Make A Yeast Starter: Supercharged Yeast
A Yeast Starter is a common wine making and brewing term for the process of propagating additional cells from a culture of yeast. We take a dry yeast and provide it with what it needs grow and multiply. Creating a Yeast Starter is important for 3 reasons:
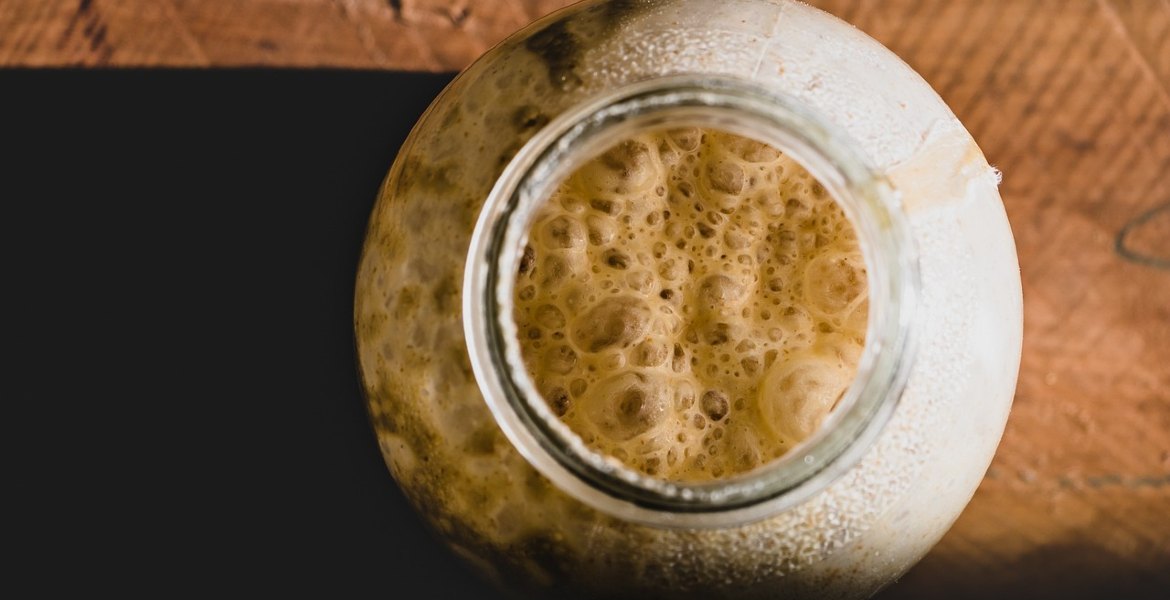
Firstly, by making a starter 1-3 days in advance, you ensure that your Yeast is healthy and strong. You can check by looking at your Starter. Once it’s foamy and creamy looking, you know the Yeast is active and healthy.
Secondly, you encourage the Yeast to reproduce and increase the number of cells available. By making the Yeast Starter you will increase the cell count of the Yeast, as once they’re active they’re multiplying. More Yeast means a faster start to Fermentation and a better chance of keeping out unwanted bacteria and Wild Yeast infection in your Must.
Thirdly, it supports the Fermentation of high Specific Gravity juice. If you are making a high Specific Gravity wine you will need more Yeast to start the fermentation. High specific gravity wine will only ferment completely when you pitch ample quantities of yeast.
Wine Yeast Starter Recipe: The Secret
- 1 tablespoon of Sugar
- 1/2 teaspoon Yeast Nutrients
- 10 mg of Vitamin B1 (1 crushed tablet) optional as sometimes already added to Yeast Nutrients
- 1/4 teaspoon Citric Acid
- 300 ml of boiled water (cooled to 68o Fahrenheit / 20o Celsius)
Wine Yeast Starter Equipment
- Thermometer
- 500 ml (1 pint) glass jar with a cap
- Kitchen measuring jug
- Kitchen measuring spoons
- PBW (Powdered Brewery Wash)
- Sodium or Potassium Metabisulfite
How To Make A Yeast Starter: Step By Step
To create a Yeast Starter that dramatically improves your chance of wine making success, follow these steps:
Step 1: Sanitization Is Key
Like everything else in winemaking, we start by ensuring a clean and sanitary environment for your Yeast Starter. Using PBW, clean your Glass Jar and Lid, Thermometer, Measuring Spoons and Measuring Jug. Now Sanitize all these items using a 10% Sodium Metabisulfite solution.
Put some of the Sanitizing solution into your Measuring Jug and allow the Thermometer and Measuring Spoons to soak. Put the remainder of the Sanitizing solution into your Glass Jar, place the lid on tight and swirl the liquid around in the jar so that it touches all surfaces. Let all your equipment sit for 15 minutes to Sanitize. Finally, thoroughly rinse the Glass Jar with cool tap water. We want to ensure there is no residual sanitizer as it may interfere with our Yeast.

It’s important to Sanitize all the equipment to remove any bacteria and Wild Yeast. This ensures all Fermentation is due solely to the Yeast we choose to add.
Potassium Metabisulfite: we recommend LD Carlson brand.
Step 2: Ingredients Matter
Boil 500 ml of water in your kettle. Measure 300 ml of boiling water into your Measuring Jug. In the sanitized Glass Jar, add 1 tablespoon of Sugar, 1 crushed Vitamin B1 tablet (10 mg) (optional as some Wine Nutrient Salts already contain Vitamin B1, check on the label as it may not be needed), 1/4 teaspoon of Citric Acid, and 1/2 teaspoon of Wine Nutrient Salts.
These carefully selected ingredients lay the foundation for a nutrient-rich environment conducive to Yeast activation.
Yeast Nutrient: we recommend Fermaid O brand.
Step 3: When To Add Warm Water
Now pour into your Glass Jar the 300 ml of boiling water waiting in your Measuring Jug. Place the Lid on the Jar loosely tighten and set aside to cool. This mixture must cool to 20 degrees Celsius, so allow about an hour.
The temperature is a critical factor in creating the optimal conditions for Yeast activation, so use your Thermometer to ensure the temperature is correct. Do not add your Yeast to a liquid that is warmer than 25 degrees Celsius, as you risk killing the Yeast.
Step 4: When To Add The Yeast
Use your sanitized Thermometer to check the temperature of the mixture in your Glass Jar. When the temperature reaches 20 degrees Celsius, it’s at the correct level. Measure the amount of dry Yeast based on the volume you intend to ferment (this is usually one complete sachet). This step ensures that your Yeast Starter provides the ideal Yeast volume for your Must, allowing fermentation to flourish.
Step 5: Shake And Secure Yeast Starter
Seal the jar tightly with its lid and shake vigorously for 30 seconds. This step is crucial for homogenizing (getting it mixed properly) the mixture and initiating the Yeast activation process by dissolving Oxygen in the solution. After shaking, loosen the lid slightly to allow gas to escape while preventing contaminants from entering the jar. If you are using a Flip-top canning jar, this is a simple as flipping up the clip without opening the lid.
Step 6: When Do I Use A Yeast Starter
Patience is a virtue. Place the jar in a warm dark location, such as a hot water cupboard, for 48 hours (2 days). This period allows the yeast to multiply and build a robust population. After 2 hours, healthy Yeast will already have already started to multiply and this is visible by gas bubbles in the liquid.
Step 7: How To Use A Yeast Starter
After the 48 hour period, you can assess your Yeast Starter. A successful starter is creamy and bubbly and this tells us it’s ready for use. Tighten the lid on your jar, shake the jar, and pour half of the contents into your Must.
Step 8: How To Store A Yeast Starter
This is a wonderful Yeast Starter hack! By using this hack, not only can you store your Yeast Starter, you can propagate more Yeast. Here’s how:
To your Yeast Starter jar, add 150 ml of boiled and cooled water (Step 3). Add 1 tablespoon of sugar and 1/2 teaspoon of Wine Nutrient Salts (Step 2). Tighten the jar lid, shake for 30 seconds then loosen the lid so that gas can escape, but nothing else can enter. Leave the jar to sit for several hours.
When the bubbling has resumed, place the Yeast Starter Jar into a refrigerator and tighten the lid. You can store it there for 1 year! Whenever the Yeast Starter is required, take the jar from the refrigerator 2 days before it is required. Loosen the lid on the jar and ensure the Yeast Starter is warmed to approximately 20 degrees Celsius (Step 6). When it it looking bubbly and happy, return to “How to Use a Yeast Starter” (Step 7).

Supplies Needed To Make A Yeast Starter
For those who’d like a list of supplies needed to make a Yeast Starter, this is it. The brands we recommend are tried and tested favorites of our team.
- PBW (Powdered Brewery Wash)
- Potassium Metabisulfite: we recommend LD Carlson brand
- Yeast Nutrient: we recommend Fermaid O brand
- Citric Acid: we recommend North Mountain Citric Acid brand
- Cane sugar: we recommend Demerara Sugar
- Wine Yeast: the variety needed for the wine style you’re making
- Flip-top canning jar 16 ounce (500 ml)
- Canning Jar Labels
Making A Yeast Starter: Final Word
By mastering the art of creating a Yeast Starter using our proven steps, you are not only ensuring yeast viability but also laying the groundwork for successful winemaking. By attention to detail and understanding of the fermentation process, you reduce the chance of failure. I hope this guide will leave you feeling confident that you understand the relationship between yeast and your wine Must.
Make A Comment